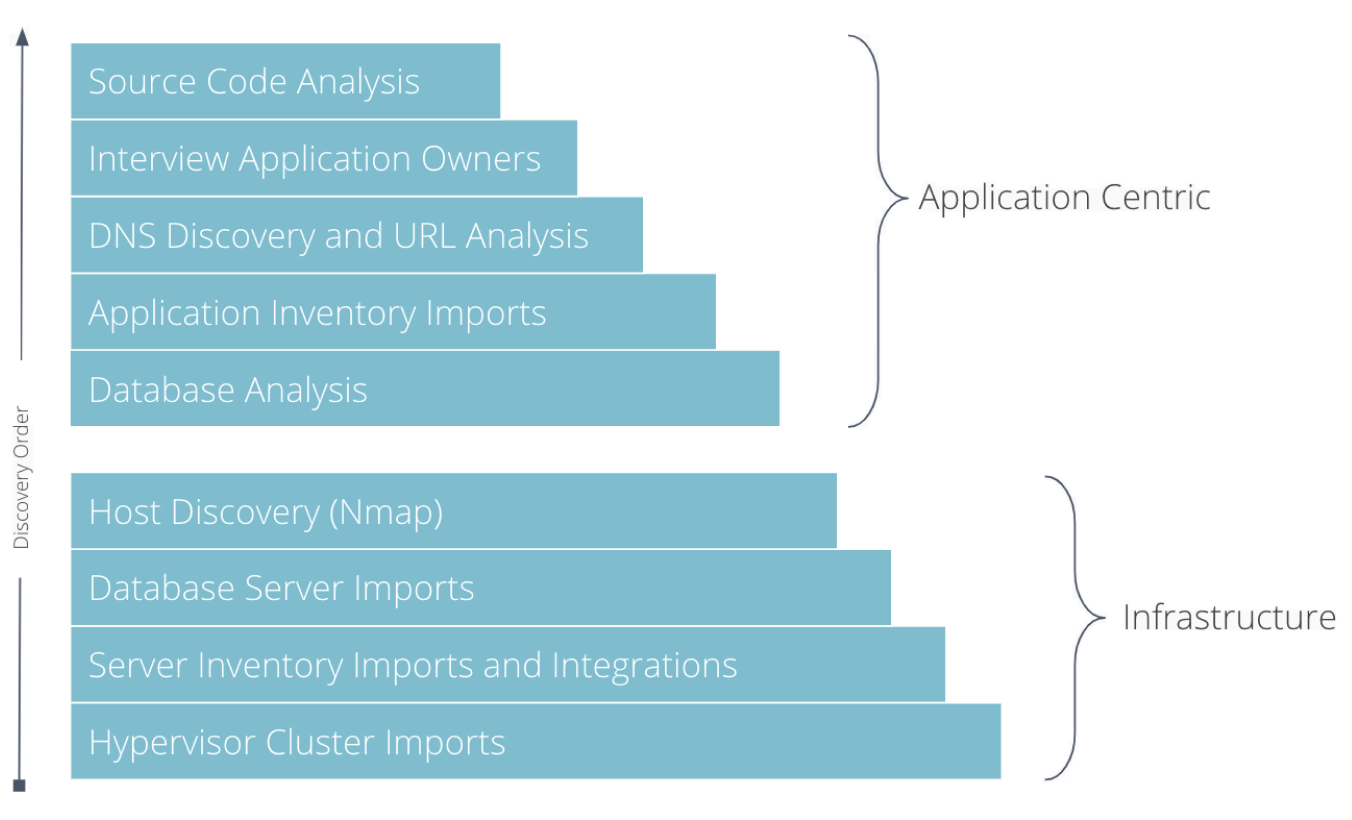
Layering Discovery Techniques
Cloud migration is the process of moving your data, applications, and other elements to the cloud. However, the path to the cloud can be long and painful without proper planning and execution. By following Tidal’s five discovery layering techniques, you will be migrating to the cloud with ease!
Five Steps To Discovery Bliss
1) Import Your Spreadsheets
If your already have some data collected in spreadsheets, the first step to begin your cloud migration project is importing a spreadsheet of Virtualization Clusters, Servers, Databases Instances and Applications. Tidal’s importer will guide you through mapping your columns to our fields, create your own fields and even make associations between dependencies if you have captured these.
NB: See additional ways on importing your applications and servers in the API docs.
2) Integrate Your Hypervisors
Once you have imported your data, you can begin to synchronize your inventories
via tidal sync servers. Tidal sync supports many server
inventory management tools such as VMWare and HyperV with more possible via
scripting (ask us).
If you have VM Ware’s vSphere, tidal sync vsphere will
handle everying with just read-only credentials required.
Scheduling your sync:
It is useful to setup a cron job or Windows Scheduled Task for this process, and we recommend synchronizing your inventories no more than once per day.
This will keep your resource inventory up to date and show you usage trends over time in the Analyze feature.
3) Aggregate Server Usage Statistics
Tidal provides you with a simple and effective way to gather machine statistics (RAM, Storage, CPU allocations and usage) from Windows and UNIX/Linux server environmens. In Windows, we use WinRM to Invoke-Command across your servers, and for *NIX we leverage ansible. Both of these approaches output JSON which is securely sent to your Tidal instance using the tidal command.
Checkout this guide for a quick and clean approach to gathering server usage statistics. See the machine_stats repository for more implementation details.
NB: Feel free to fork the repo and modify to suit your needs, or to show your security team and give them comfort. This extensibility and transparency is core to our approach.
4) Fingerprint Web Applications
a.) The initial step in your cloud journey is discovering what you have.
It can be hard to remain informed about all the domains and applications hosted
in your environment, which is why we created the tidal discover command.
With your customized Discovery Plan you can obtain both private and public
domains within your datacentres in under 60 seconds.
This tidal-tools guide contains examples for creating your own Discovery Plan to scan multiple networks and DNS services.
b.) With a list of domains in hand, the next step is to analyze the applications hosted on these domains.
tidal analyze web will fingerprint the technology on both your internet sites
and intranet applications behind your firewall in seconds, without needing to
install agents.
Whether you have 1 or 1 million end points, Tidal Tools centralizes the data
gathered into our platform for you to analyze further and plan with,
simplifying your application centric cloud migration.
For detailed information and steps on analyzing your domains, be sure to checkout this guide.
5) Analyze Your Source Code
Finally, to find the applications which will migrate more easily to cloud-native technologies you can analyze your source code and rank your applications by Cloud Readiness.
Doing this for each of your custom applications which have a Transition Type
of Refactor or Replatform will give you the data needed to prioritize your
application migrations. To analyze your source code, you need the Application
ID, to be logged in with tidal-tools and a copy of the source code checked
out.
You can find the Application ID in the URL bar when looking at an
application. e.g. if I’m loking at an application in Tidal, the URL
will show https://[your workspace].tidal.cloud/apps/111/overview Here, 111 is my
Application ID.
I can now analyze the source code with:
cd /path/to/source-code
tidal analyze code --app-id 111 .
To find additional information about this feature, visit the guide on analyzing your source code.
Conclusion
Immediately getting an idea of the size and scope of your migration is critical to successful cloud migration planning.
Our goal at Tidal is to provide you with useful information within 60 seconds of signup, and letting you layer in additional information from discovery sources as needed.
You do not need to spend weeks and months installing discovery systems to start planning your cloud migration any more.
Not yet a customer? See tidalcloud.com and Try For Free.